Well hey there, Tuesday.


You know what you need?  A cupcake.  {Isn't my friend Missy's handwriting super cute?  I always wished I had super cute girl handwriting, but instead I have my mother's cursive/print/too loopy for anyone else to comprehend writing.  Sigh. At least I know how to make cupcakes!  That makes up for the friends I can't get by being crafty}


And by the way, the answer to "what do you need?" is always "a cupcake."  Do you have a Gigi's cupcakes where you live?  Because OH.MY.GOSH.  I could bury myself in one of those and happily never be seen again.  JOY.  {I had one from their very first shop in Nashville when my awesome sorority bigbig brought me one.  Love at first drool.}  If I could eat one every day and not weigh 542 pounds, I would.  Because let's face it, the reason I work out at all is to counteract all the cupcakes and pasta I eat.


PLUS, these cupcakes are moist chocolate cake and CARAMEL buttercream frosting!  Remember the homemade caramel sauce I told you about on Friday?  We're putting it to good use today, people.  Confession: I don't even like caramel.  But this caramel buttercream is just bee-yond {is that from a movie?  Or did my weirdo brain invent it and try to convince me its from a movie?}  Ok, pretty much anything that has 2.5 sticks of butter in it is probably going to be a winner.  And a heart attack.  Excuse me while I go do some guilt-squats.

Chocolate Cupcakes with Caramel Buttercream Frosting
Makes 24 cupcakes and way more frosting than you need for 24 cupcakes, feel free to halve frosting.  Adapted from Cooking Classy and Brown Eyed Baker

For the cupcakes:
2/3 cup cocoa
1 teaspoon baking soda
1 cup boiling water
1/2 cup butter, melted
1/3 cup canola oil
1 3/4 cup sugar
1 1/2 teaspoon vanilla extract
3/4 teaspoon salt
2 large eggs
2 large egg yolks
1/2 cup heavy cream
1 3/4 cup all-purpose flour

For the frosting:
2 1/2 sticks butter, softened
2 1/2 cups powdered sugar
a pinch of salt
1 teaspoon vanilla extract
2 tablespoons heavy cream
3/4 cup caramel sauce

Preheat the oven to 350.  In a large heatproof bowl, combine cocoa and baking soda and stir in boiling water.  Stir until combined, then allow to sit for 5 minutes.  Meanwhile, in a stand mixer mixing on low, blend together butter, canola oil, sugar, vanilla, and salt until well combined.  Mix in eggs and egg yolks, mixing well after each addition.  Blend in cocoa mixture, then heavy cream.  Slowly and carefully mix in flour.  Divide batter among 2 12-count muffin tins and bake 18 minutes.  Allow to cool completely before frosting.

For the frosting, beat the butter with a whisk attachment on a stand or handheld mixer until butter is smooth.  Add powdered sugar and salt and beat for about 1 minute, until most of sugar is moistened.  Add vanilla, heavy cream, and caramel and beat mixture on high for about 4 minutes, until the whole thing is light and fluffy, scraping the bowl as needed.  Then frost the cupcakes!


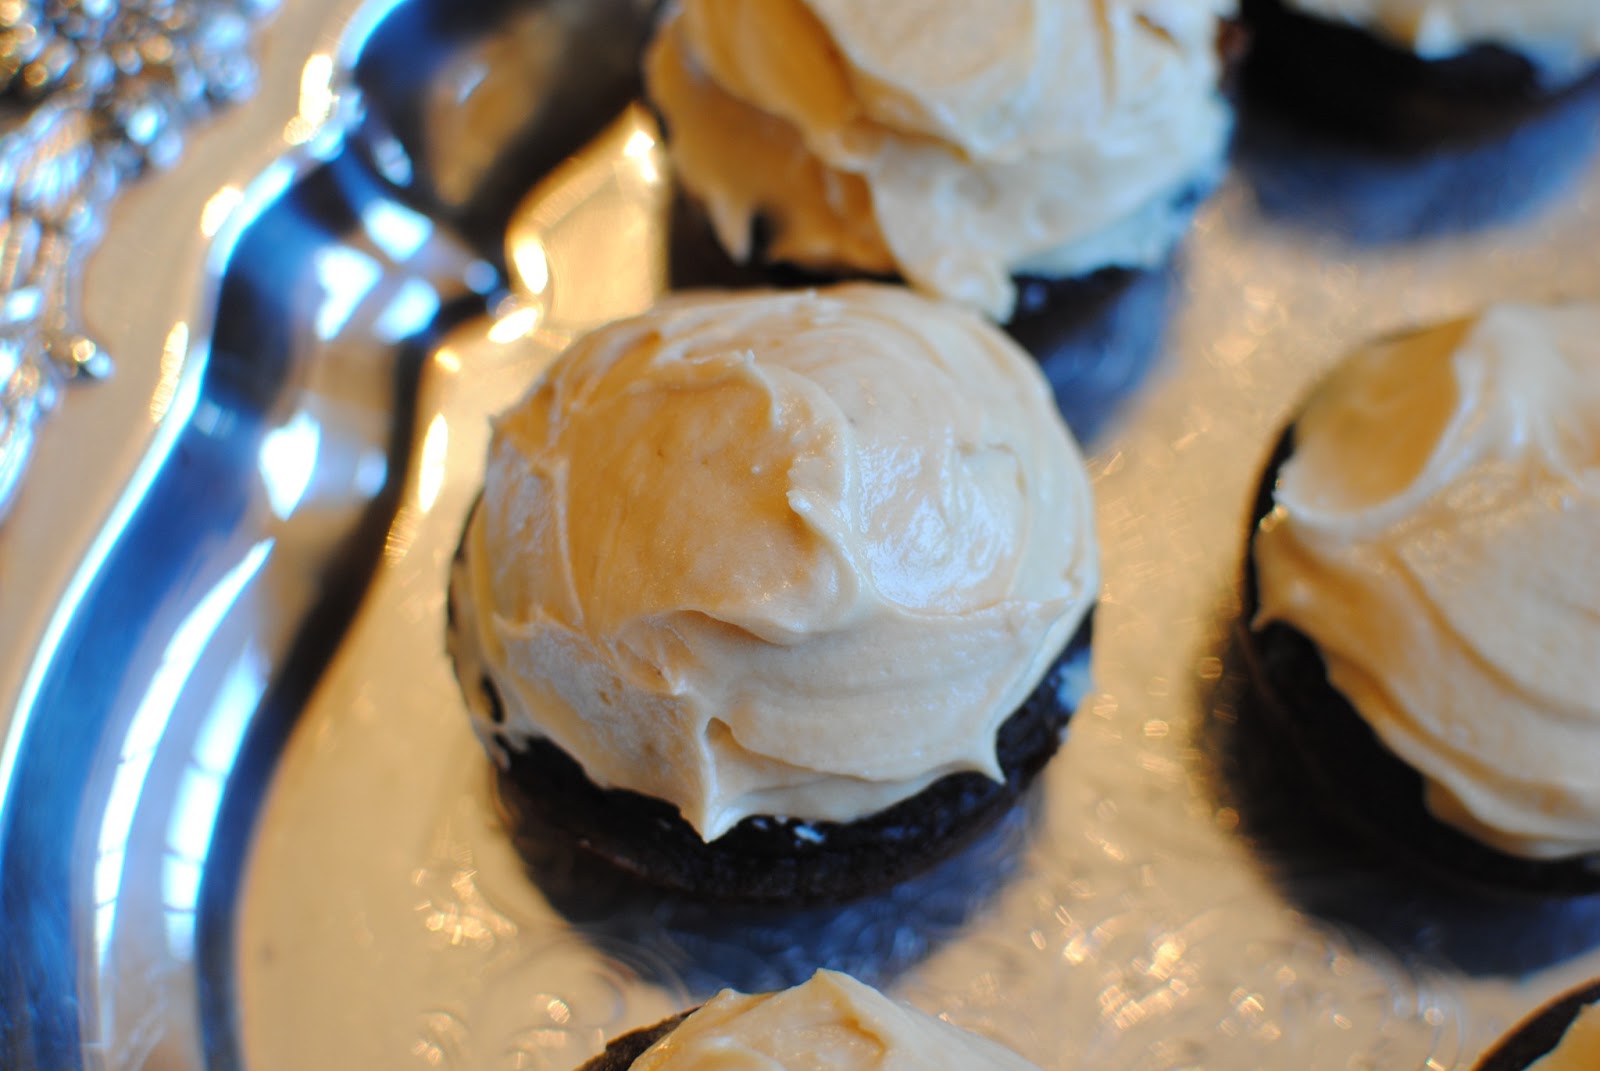
I'm so glad I don't have pictures of when I tried to pipe these.  Amateur hour.


Oh where to begin?


How about with these?  Yep, that feels like a good place.  RED VELVET CAKE BALLS.  Y'all.  I was nowhere near the cake ball wagon, and now I'm riding on top, standing up waving something and yelling WOOOOOOO!


Be warned: you have to do some despicable stuff to a perfectly nice red velvet cake.  All in the name of goodness though.

While I'm warning you, I think you all deserve a heads up about this week.  It's dessert week!  Meaning, I made a wagon full of desserts this weekend, and this week we are going to re-live them.  Well, re-live for me, regular live for you.  I just want you to know that as much as I love salmon, brown rice, and greens, those are not happening here this week.  Sorrynotsorry.


Instead you get CHOCOLATE and more CHOCOLATE!  And some caramel and, weirdly enough {for me} white chocolate and lemon.  But we'll discuss those later.  Today, we have red velvet cake, torn up and mixed with cream cheese icing, unceremoniously balled up and dunked in chocolate.

You're going to love it.


Ha.  Those look terrible!  I would highly recommend using a cookie scoop or melon baller or something to make your cake balls lovely and round.  Otherwise, they'll end up all, um, oddly shaped. Like these.  Thankfully, they get sprinkled with white chocolate and no one even notices!


Check it out, check it out!  {Little bit of a sugar high over here}

Red Velvet Cake Balls
Makes 30-35, recipe adapted from Iowa Girl Eats, thank you m'am.

1 box red velvet cake mix, baked according to instructions
6 tablespoons unsalted butter
5 oz cream cheese
1 1/2 cups powdered sugar
1 teaspoon vanilla
16 oz Baker's semi-sweet chocolate
4 oz white baking chocolate


Once red velvet cake is baked and cooled, tear it up with a fork (eek, sorry cake!).  Then in a stand mixer (or with a handheld electric mixer) cream together butter and cream cheese until they are thoroughly blended.  Add in vanilla and beat.  Then add in powdered sugar, 1/2 cup at a time, beating until the whole mixture is combined.  Add in frosting to cake crumbles bit by bit until the cake/frosting mixture is moist (sorry, m-word) and the crumbles stick together.

Scoop out tablespoon sized balls of cake mixture.  Line up on a parchment lined baking sheet and refrigerate for at least 1 hour.  Then, melt the bakers chocolate (I recommend melting and using 4 squares at a time) by microwaving for 30 seconds, stir, and repeat.  Then dunk cake balls into the chocolate, roll around with a spoon, and place back onto the sheet.  When all the balls are chocolated {new word}, melt the white chocolate and sprinkle around on top of the cake balls with a spoon.  Refrigerate until you serve!


Final warning: husbands LOVE these.


Today's post is mostly a teaser...


I want to show you how to make caramel!  And then next week, I'll show you something extra special to do with that caramel :)

But first, this is what my kitchen has looked like alllll day.

In reality, this was one of its better moments.  Four to five new recipes came out of this kitchen today, so you know next week is going to be {sweetly} spectacular!

But caramel.  Before today I did not understand how caramel was made at all.  I had read up on it, but until you're standing in front of the stove watching sugar get crumbly and then melt, there's no way to understand it.  The good news?  This recipe only takes 10 minutes to make, and will blow you away.  Let me walk you through it visually.


Start by pouring one cup of sugar into a 2-3 quart saucepan over medium high heat.  Begin to stir.


As you stir, the sugar will begin to get crumbly.  This is normal!  Keep stirring.


Soon, the sugar will melt completely.  Stop stirring at this point.  Allow the sugar to continue to cook until it appears reddish-brown {sort of dark amber} and smells toasty.  If you have a candy thermometer, it should be 350 degrees.  When it reaches this deep brown color, add in 6 tablespoons of butter.  {Warning!  The turn from dark amber to burnt is quick, be sure to watch it carefully and not let it burn}


The butter will make it bubble like crazy.  Stir until the butter is completely melted.  Then remove the pot from heat and pour in 1/2 cup heavy cream and 1 teaspoon flaky salt.  {I never said this recipe was good for you.}


After it's all mixed, is should look something like the picture above!  Let it cool for 15 minutes, then store in a glass jar.  {Mason jars are just enchanting}


Treat yourself with caramel over ice cream, brownies, or come back next week and I'll show you how to make the most amazing caramel buttercream frosting EVER.

Hope your weekend is wonderful!

Homemade Caramel Sauce
Makes about 1 cup; recipe adapted from Brown Eyed Baker

1 cup sugar
6 tablespoons unsalted butter
1/2 cup heavy cream
1 teaspoon flaky salt

Pour sugar into a heavy bottomed saucepan over pretty high heat.  Stir sugar while it crumbles, and stop stirring when all the sugar is melted.  Allow it to cook until it's dark amber (reddish-brown) colored and smells toasty {or reads 350 on a candy thermometer}.  Add in butter and stir until all the butter is melted.  Remove from heat and mix in heavy cream and salt.  Let cool and store in a glass jar.


I feel so domestic.


I leave water cups just... everywhere.


Seriously, if I come to your house, assign me a cup with a specific design, otherwise I will use a cup, completely forget where/what it is, and get a new one.  {Sorry in advance} It's one of my mother's favorite features about me. {HA.}  And afterwards, I feel guilty about the 8 water cups I went through in a three hour period.  But I'm always too confused {ashamed} to clarify where my cup is just to find out that my conscientious host has already put it in the dishwasher.


But for why am I telling you this?  To demonstrate that if I, lazy-water-cup-leaver, will stand in one place {at the stove} focusing on one activity {stirring} for twenty minutes, this risotto MUST be worth it. {And yes, Mr. S&S has assigned me a particular cup so that I stop just leaving them everywhere}


Also, let's just get real for a minute.  Mr. S&S's real name is Nick.  Surprise!  Typing Mr. S&S is awkward, and I'm done with it. He's probably glad to have his real name back, too.


Ok, back to risotto.  Y'ALL.  If you've never made risotto, it can be a pain in the butt.  However, it is probably Nick's number one requested meal, for very good reason.  Rice is slow cooked in shallots, wine, butter, chicken stock, and then made extra creamy with my secret ingredient {cream cheese!}.  It also serves as a beautiful, creamy base for veggies and, ahem, more cheese.


It's totally worth standing in one place for twenty minutes.  Plus you can count vigorous stirring as a bicep workout, which totally negates the calories in this recipe.  Promise.

Creamy Sweet Potato Risotto (with Chicken)
Serves 4 as a main dish, 8 as a side dish

1 1/2 cups arborio rice
3/4 cup white wine
1 shallot, minced
1 clove of garlic, minced
3 tablespoons butter
6 cups chicken stock (good quality, I also use a 1-2 cups of water instead of all stock)
2 sweet potatoes
2 chicken breasts
1 lemon, zested and juiced
1-2 oz cream cheese
1/4 cup parmesan, plus more for topping

Preheat the oven to 400 degrees.  Wrap the sweet potatoes in aluminum foil and allow them to bake for 1 hour.  Slice the chicken breasts into 1 inch thick pieces (our chicken breasts come super thick, but this might not be an issue for you) and sprinkle with salt and pepper.  These will cook for about 25 minutes.

Meanwhile, melt the butter in a large pot and warm the chicken stock in a separate pot.  When butter is melted, add in minced shallot and garlic and let saute until very fragrant (about 1 minute).  Then pour in uncooked rice.  Stir around in the butter/shallot/garlic mixture until rice is well coated.  Pour in wine and stir until the wine has evaporated/ been absorbed by the rice.  Then add two ladles of warm stock.  Stir continuously until the rice absorbs the stock.  Add another ladle of stock and repeat.  Make sure to stir and let the rice absorb the stock between each ladle.

After the rice has absorbed almost all the stock, taste to make sure the rice is al dente.  If it needs more stock, keep going, if not you're finished with the stock (I usually end up using somewhere around 5 cups).  After sweet potatoes are cooked, peel off skins, gently mash and add to rice.  Then add about 1/2 teaspoon of lemon juice and 2 tablespoons of lemon juice and incorporate.  Chop the cooked chicken into bite sized pieces and add to the rice.  Finally, add the cream cheese and parmesan and stir until it's all melted and distributed.  Serve with a squeeze of lemon and some parmesan on top!


And now we wait 3 months for me to remember to make risotto again.  Sorry, Nick.


It's pizza night, people!


I don't know about you, but without excessive hours of the Bachelor on Monday night, I'm a little lost.  What to do with those now free hours?  Read?  Write my last grad school papers?  Pinterest {most likely}?  I know one thing for sure, I need to be eating some homemade pizza.


So homemade pizza is slightly more difficult than picking up the phone and calling Papa John's, but seriously, SO.WORTH.IT.  I probably make homemade pizza once a week, and every time its different.  Sometimes I go old school with pepperoni and cheese {that would be this recipe}, but sometimes I go crazy with brussels and bacon {I'll ease you into that one}.  And it's taken me about 20 times to get my technique just right.


I like to stretch out the dough, let it bake for just a few minutes {3-4}, then layer toppings and cheese.  It's pretty fantastic, if I do say so myself.

How 'bout you give it a shot and let me know if you were sad the Papa wasn't there?

Homemade Pepperoni Pizza
Serves 2 very hungry people with a few leftovers

2 cups cheese (I mix in just a little cheddar with my mozzarella)
1 ball of dough (I buy wheat dough from TJ's-cheater cheater, I know)
About 9 oz pizza (or marinara sauce)
1 small white onion
6 oz pepperoni slices
1/3 cup cherry tomatoes, quartered
1 teaspoon dried basil

Preheat the oven to 375 and heat a skillet over medium-low heat.  Slice the onion into short slices, and slowly caramelize it in a bit of canola oil in the skillet (this will take about 15-20 minutes to lightly caramelize).  Meanwhile, start stretching the pizza dough to fit onto a large non stick cookie sheet.  Wheat especially will take a few minutes of work to get it all evenly distributed.  Once it is stretched, bake it for 3 minutes in the oven.  Then when the onions are finished layer the toppings on the warm dough: sauce, half the pepperonis, the onions, basil, mozzarella, more pepperonis, and some cheddar.  Bake for 15 minutes and enjoy!


Ugg, I'm hungry all over again.


Did you know counseling is all about wellness?  Because it's such a big part of my life, I figured I'd add a few counseling related topics into the blog from time to time.  Let me know what you think!

About a month ago, I noticed that I was tired all.the.time.  I could sleep for 6 hours or 9 hours {ahem, or more} and still wake up feeling groggy and zombie-like all day.  I couldn't seem to catch up on sleep or do anything to make myself feel more rested.  And then entered some new information: "you're grinding your teeth at night."  Mr. S&S had been enduring a habit that I hadn't really had since first grade {when, my mom likes to tell people, I sounded like a freight train coming through the walls.  cute. somehow, no permanent damage to the teeth}.


After that, I started to piece together that the stress I've been feeling {and suppressing} from grad school work, counseling high needs children, trying to put my best work into a blog, and worrying/ trying not to worry about our future {lots of things up in the air right now} had crept into my sleep.  And ruined it.

So I began to research.  I wanted to make changes for myself that would be healthy and research-based, not just O magazine based {no offense to Oprah}.  The following things have worked for me, so far.  And so far, no more grinding!

1. Carve out a few minutes a day for quiet meditation.  
This doesn't have to be a scary zen-like trance for an hour a day.  Start small: 5 or 10 minutes.  Some options of things to meditate on: things you are grateful for, scripture {my personal choice, as my faith is very important to me}, body scans {this is where you start at the top of your head, thinking about what's going on, what you feel, then slowly move down to your toes.  don't make any changes, just notice}, or anything else that is calming.  Research supports that daily meditation has biological and psychological benefits.

2. A pre-bed ritual
This one has been tougher for me to get right, but is a very cool thing.  Find just a few things {maybe 15 minutes} that help you calm down and get into the relaxing sleep mindset.  For instance, make a cup of chamomile tea, turn off all your screens {iphone, ipad, computer, tv} and most of the lights in the house {think about symbolically powering down for the day}, then wash your face with something really nice smelling {or take a warm bath}, and only creep into bed when you're ready to sleep.  Take your time with these things {walking around with hot tea will make you slow down!}, and do it fairly consistently.

3. Lavender
This is totally an excuse to buy that lavender diffuser you {I} have been wanting.  All those products that say lavender will help you get better sleep: they're right!  Several studies I found say people who slept in a room where they smelled lavender got better REM sleep and woke up feeling more rested.  I have a spray that I've sprayed on my pillow and in the bedroom, and I've really enjoyed it {side note: this is SO something my father would do.  my mom is definitely laughing somewhere right now.  further proof that you become your parents.}

Those are just my three bits of wisdom for today.  Let me know if you'd like the references to the articles I used {I was just trying to spare most of you from making this into an APA research paper}.

What about you?  How do you de-stress and get better sleep?

Sleeping photo from cnn.com


What someone likes in their granola bars probably says a lot about them.


I like mine dried fruit free.  And preferably with lots of chocolate and peanut butter.  So basically, I like cookies.  I guess that tells you I'm six years old.

But for those times when I am actually setting out to create a more healthful snack option {aka when my hand is not permanently stuck in a bag of goldfish}, I'll omit the chocolate and peanut butter.  Sigh. I started to make these thinking: I hope they don't taste like cardboard.  And guess what?  They are way way way better than cardboard!


I guess that's not much of a recommendation, huh?  Ok, how about this: they were gone 24 hours after their creation due to continued, unstoppable nibbles throughout the day.  A lot of these this thought process was happening: "They couldn't have really been that good, right?  Maybe just another taste to check... Wow, I'm proud of myself all over again.  Should I make a second batch right now?  What's gunna happen when I run out if I don't make a second batch?  What if Mr. S&S likes them?  Then I'll have to eat faster to make sure I get my share!  I'd better just make more."


Guess what else?  Mr. S&S, the man who loathes coconut {and is thus the reason there are no recipes using coconut oil on this site, despite its uber-trendiness with food bloggers} ate these bars which include coconut and liked them.  Even when he knew the coconut was in there!  Miracle of miracles!

So I know you all will want to adjust this recipe to include the contents of your own pantry.  In which case I would beg and plead with you to keep the pecans.  Ohforgoodnesssake, they make the bar.  These are pretty subtly flavored bars and the toasted pecan flavor is key.  Just keep that in mind, pleaseandthankyou.  {Also, regular peanut butter would be a bit of a flavor risk since it's a much stronger taste than almond butter.  I would just use more honey and butter instead.}

Pecan & Almond Granola Bars
Makes 12 square bars

1 cup rolled oats
2/3 cup pecans, roughly chopped
1/3 cup sliced almonds
1 cup unsweetened, shredded coconut
1/2 cup ground flax seed
2 tablespoons butter
1/2 cup honey
1/4 cup almond butter

Preheat the oven to 350.  Spread oats, pecans, almonds, and coconut on a large baking sheet and bake at 350 for 10 minutes.  Then turn oven down to 300 degrees.  Place toasted mixture into a mixing bowl.  Measure out honey and almond butter (I measure them both into one cup to reduce dishes).  Melt the butter and pour hot butter into honey and almond butter.  Stir the honey, butter, and almond butter until its all combined (the heat of the butter should help this).  Then pour sticky mixture into the toasted mixture and stir until everything is evenly coated.

Line an 8x8 pan with parchment paper and press granola mixture into the pan.  Use wet fingers or the back of a spoon to press down the mixture into the pan.  Bake at 300 for 10 minutes.  Then let the bars sit out in the pan for 2 hours.  After 2 hours, slice into 12 pieces and store at room temperature!


It's on, Nature Valley.


Tacos can heal the world!


At least my world.

I'd like to teach the world to sing in perfect harmony!  I'd like to buy the world a taco, and keep it company!  {What?  No, I wasn't born when that commercial happened, but I'm up on things.  Ok, my father used to sing us every theme song and jingle from 1970-1985}


After a beautiful {gorgeous, sunny, 65 degree} weekend, it's back to the daily grind, and nothing cheers a Monday up like a shrimp taco.  I actually made these tacos while we were in Wyoming, because nothing is quite as foolproof as avocado {or guacamole} + salsa + tortilla + kicky shrimp {or shrimps, as my great-aunt used to say}.  I really don't think you can screw up a taco, because the toppings are totally up to you!  Cheese? Yes!  Tomatoes? But, of course!  Slaw? Absolutely! Apple?  Go for it! {This is also known as "cleaning out your refrigerator into a tortilla}


We used to live in Nashville, which I also refer to as: the town with 2,464 amazing taco restaurants.  Our current town is more like: the town with two very below average "mexican" chains and NO {repeat ZERO} taco places.  Let's not even start with the food truck ratio of Nashville to here {7,983:0}.  It's enough to make me jump in my {tiny} car and drive around town offering tacos out the window.  Which is probably enough to get me arrested.


So in lieu of any good taco providers, I provide for myself.  It's handy that I'm pretty good at it.  I've also included an un-pictured recipe for lime, cilantro, and apple slaw which is also kick you in the pants awesome on top of shrimp in a taco.


Basic Shrimp Tacos
Serves 2 (verrry easily multiplied)

2/3 lb shrimp, peeled and deveined
3 tablespoons panko crumbs
1/8 teaspoon cayenne pepper
1/8 teaspoon tony chachere's seasoning salt
1/8 teaspoon smoked {or regular} paprika
1/8 teaspoon garlic powder
4-6 small tortillas

Toppings and such:
Avocado or guacamole
Quartered cherry tomatoes
Salsa
Cheese
Sour cream
Red onion
Slaw (check out below)

Heat a skillet to medium-high heat.  Toss shrimp with panko crumbs and spices until they're evenly distributed.  Pour 2 tablespoons canola oil into the skillet, and when hot, add the shrimp.  Cook until shrimp are pink all the way through, about 5-7 minutes.  Layer in a tortilla with amazing toppings!

Lime, Cilantro, and Apple Slaw
Serves 6+ as a taco topping

1 bag of pre-shredded cabbage
1 large redish apple (no greens or yellows)
Juice of 2 large limes (about 1/2 cup)
2 tablespoons honey

Place the cabbage in a large bowl.  Mix together the lime juice and the first tablespoon of honey and taste.  It should be tart, but not sour.  If mixture is sour, add the second tablespoon.  Pour over cabbage and mix well.  Then, slice and apple into small chunks and toss with cabbage.  Voila!  Finito.


Related Posts Plugin for WordPress, Blogger...

Popular Posts

Search This Blog